
Being in need of a pair of Field Stand Clips for my 1942 WNG I looked on Drag’s site and was shocked to find that the cost of one 2462-41 clip was £20.77. John Budgen was a bit better at £20 a pair but he had not had any in stock for a while. The shape of the clip didn’t look too complicated so I thought I would have a crack at making a couple myself.
There is a ‘YouTube’ video, which is about 15 minutes long and shows the process needed to make a spring clip that is...well...springy (you can speed through the spring tempering bit if you get bored, but is worth sticking it out to see the full spring tempering process which is about 7 mins). Here is the link:
You can view it full screen by clicking on the play arrow then the YouTube icon in the bottom right
I will post a few images and desribe the process here for future reference should you not be able to view the video for some reason.
'How To make' WNG Field Stand Clips
-
alan.moore
- Holder of a Golden Anorak

- Posts: 1457
- Joined: Sat Jul 19, 2014 1:29 pm
- Location: Leicestershire UK
- Contact:
'How To make' WNG Field Stand Clips
Last edited by alan.moore on Tue May 28, 2019 8:30 pm, edited 1 time in total.
1939 VH Redhunter;1942 RN WNG;1951 Triumph 6T Thunderbird;1970 BSA B175 Bantam;1986 Yamaha SRX600 single;1952 VHA engined project
http://cloggymoore.wix.com/triumph-pre-unit-6t
http://cloggymoore.wix.com/triumph-pre-unit-6t
-
alan.moore
- Holder of a Golden Anorak
- Posts: 1457
- Joined: Sat Jul 19, 2014 1:29 pm
- Location: Leicestershire UK
- Contact:
Re: 'How To make' WNG Field Stand Clips
There were two versions of the WNG Field Stand clip. The first had two part numbers, 2462-40 and 2463-40, there being a top and bottom clip which were slightly different.
These were superseded within a year by clip 2462-41. I can only assume because the early clip had the habit of snapping, where the curved section met the flat section which bolted to the frame, due to all the ‘flexing’, when using the clip, happening at this point. The later clip had an additional curved section which extended the area over which the clip flexed in use.
The clips are made out of spring steel, which is a type of steel that has a high carbon content. I bought four 300 mm lengths of 3mm x 1mm strip which had been hardened and tempered for £8. One strip is enough for two clips.
I initially made a clip out of a strip of aluminium, bent in situ on the frame using the Field Stand for reference, so that I could determine the dimensions and where the various bends should be. From this I made a cardboard template marked out with the location of the centers of the bends.
I cut off a length of the spring steel strip with a cutting blade in the angle grinder. This then needed to be softened / annealed as in its ‘spring steel’ state it could not be bent without fracturing. Annealing is done by heating up the strip until a magnet will not stick to it, this is called the ‘critical temperature’ and in my case loss of magnetic attraction took place when the strip was orange hot.
I used a propane plumber’s torch for heating and made a hearth out of ‘Thermalite’ type building blocks. These are made from recycled ash from power-stations together with cement and other additives. They are cheap (£1.50 from B&Q) and although they do break down after repeated heating they reflect the heta back very well and are cheap to replace.
Once the strip is up to temperature it is left to cool down slowly in air (no quenching). The result is a softened piece of steel which can be bent and shaped cold. If you run a small round file across the edge you should feel it dig in, that means it is soft enough to bend. If it skates off then you need to re anneal the metal. (see the video)
To produce the curves I used an assortment of wooden dowels and metal tubes, together with the vice and a soft faced hammer, to bend the steel into the required shape.
- Early version of the spring clips 2462/2463-40
- Early field stand clip different top and bottom.JPG (33.86 KiB) Viewed 5887 times
- Later clips 2462-41
- Later Field stand clip-same top and bottom.jpg (8.04 KiB) Viewed 5887 times
I initially made a clip out of a strip of aluminium, bent in situ on the frame using the Field Stand for reference, so that I could determine the dimensions and where the various bends should be. From this I made a cardboard template marked out with the location of the centers of the bends.
I cut off a length of the spring steel strip with a cutting blade in the angle grinder. This then needed to be softened / annealed as in its ‘spring steel’ state it could not be bent without fracturing. Annealing is done by heating up the strip until a magnet will not stick to it, this is called the ‘critical temperature’ and in my case loss of magnetic attraction took place when the strip was orange hot.
I used a propane plumber’s torch for heating and made a hearth out of ‘Thermalite’ type building blocks. These are made from recycled ash from power-stations together with cement and other additives. They are cheap (£1.50 from B&Q) and although they do break down after repeated heating they reflect the heta back very well and are cheap to replace.
- Hearth made from Thermalite blocks
To produce the curves I used an assortment of wooden dowels and metal tubes, together with the vice and a soft faced hammer, to bend the steel into the required shape.
Last edited by alan.moore on Tue May 28, 2019 8:41 pm, edited 1 time in total.
1939 VH Redhunter;1942 RN WNG;1951 Triumph 6T Thunderbird;1970 BSA B175 Bantam;1986 Yamaha SRX600 single;1952 VHA engined project
http://cloggymoore.wix.com/triumph-pre-unit-6t
http://cloggymoore.wix.com/triumph-pre-unit-6t
-
alan.moore
- Holder of a Golden Anorak
- Posts: 1457
- Joined: Sat Jul 19, 2014 1:29 pm
- Location: Leicestershire UK
- Contact:
Re: 'How To make' WNG Field Stand Clips
For the curves where the Field Stand clips in I made a small ‘V Block’, cut from the corner of a piece of cast angle iron, and a piece of bar to press the shape using an upright hydraulic press. It can however also be done by hand.
Once you are happy with the shape make a second clip using the first as a pattern to get them the same. It is then a case of offering them up to the bracket on the frame and, using the Field Stand to align them, mark out the holes for the bolts and then drill the holes. Any fine adjustment of the bends in the clips and elongation of the mounting holes can then be carried out. Finally, without the stand clipped in, adjust the bend adjacent to the mounting point so that when the clips are bolted in place they touch each other (i.e. no gap between them) as this will ensure the stand is clamped in place tightly.
When you are happy with the clips it is time to harden them. So it is back to the heath and heating them up to the ‘critical temperature’ where a magnet will not stick to them. Wrap a length of steel wire through one of the mounting holes so you can easily lift it out of the hearth for quenching. Once you are up to heat, which will be a bright cherry red, you need to quickly fully immerse the clip in a container of oil. I use old engine oil as it is cheap and readily available. Once fully cooled down the clip will now be very hard and VERY brittle. If you run a round file across the edge it should just skate off and not dig in at all (see the video). Do not try to bend or manipulate the clip at this stage as it will break (see video!!).
To turn the hardened clip into a spring we now need to temper it. Tempering draws back the hardness so that the metal is still strong but has some give to it. The process involves slowly heating the clip evenly to a temperature of about 700 degrees F / 350C and then quenching it in water to ‘lock’ the temper at that point.
First you need to polish the clip to remove all the build up which occurred when it was hardened it. This is best done on a bench grinder fitted with a scotchbrite wheel but can be done by hand with scotchbrite or wet and dry. The surface needs to be clean and uniformly shiny.
I placed the spring on a piece of thin steel plate and initially heated the steel plate and then played the cool part of the propane flame over the clip (the cool part being the feathery part right at the end of the burning stream of gas). I had the gas turned down so the flame was no fierce. It is important to heat the clip up evenly and keep the flame moving, You will see the metal start to change colour, when this happens take the flame away and wait until the colour stabilises, then re-apply. This colour is a product of the oxide layer building up on the surface. As you get the surface hotter the oxide layer gets thicker and it absorbs the light waves falling on it differently, hence the change in colour. Tempering in daylight (but not direct sunlight) gives the best results.
The surface will initially turn a straw colour, then move through a darker browny colour to a purple then a dark blue and then a light grey blue. This grey blue is the temperature we are looking for which is about 700F/350C.. As each colour change is reached remove the heat and wait until it stabilises, any areas that do not change colour need a bit more heat, but remember a little heat can make a large change in temperature so just go gently. The video shows the whole process, so it is worth watching it to see the colours actually change in real time.
Once you have reached the light blue/grey stage put the clip into a bath of water which will ‘arrest’ the temper at the correct point. Once cooled, the clip will still have the oxide layer attached so you can compare it with the image above.
You should now have a clip with a strong spring to it. Try holding it in the vice and bending it with a pair of pliers, it should distort but spring back to its original shape.
It is then just a case of fitting both clips to the bike and trying them out. Mine were ‘very’ strong and needed a positive push on the field stand to locate, but they will definitely hold it in place. If they do fail (and I do not expect they will as I have given them both some ‘welly’ in the vice and they show no signs of fracturing) then they only cost £2 a pair and an afternoons pleasant tinkering.
Have a look at the video. A picture is worth a thousand words and my allocation for today is up.
Cheers
Alan
To turn the hardened clip into a spring we now need to temper it. Tempering draws back the hardness so that the metal is still strong but has some give to it. The process involves slowly heating the clip evenly to a temperature of about 700 degrees F / 350C and then quenching it in water to ‘lock’ the temper at that point.
First you need to polish the clip to remove all the build up which occurred when it was hardened it. This is best done on a bench grinder fitted with a scotchbrite wheel but can be done by hand with scotchbrite or wet and dry. The surface needs to be clean and uniformly shiny.
- Polished ready for Tempering
The surface will initially turn a straw colour, then move through a darker browny colour to a purple then a dark blue and then a light grey blue. This grey blue is the temperature we are looking for which is about 700F/350C.. As each colour change is reached remove the heat and wait until it stabilises, any areas that do not change colour need a bit more heat, but remember a little heat can make a large change in temperature so just go gently. The video shows the whole process, so it is worth watching it to see the colours actually change in real time.
- Tempering colours
- Tempering colours.jpg (8.33 KiB) Viewed 5885 times
You should now have a clip with a strong spring to it. Try holding it in the vice and bending it with a pair of pliers, it should distort but spring back to its original shape.
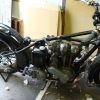
It is then just a case of fitting both clips to the bike and trying them out. Mine were ‘very’ strong and needed a positive push on the field stand to locate, but they will definitely hold it in place. If they do fail (and I do not expect they will as I have given them both some ‘welly’ in the vice and they show no signs of fracturing) then they only cost £2 a pair and an afternoons pleasant tinkering.
- Finished article
Cheers
Alan
1939 VH Redhunter;1942 RN WNG;1951 Triumph 6T Thunderbird;1970 BSA B175 Bantam;1986 Yamaha SRX600 single;1952 VHA engined project
http://cloggymoore.wix.com/triumph-pre-unit-6t
http://cloggymoore.wix.com/triumph-pre-unit-6t
-
Vincent.vanGinneke

- Holder of a Platinum Anorak

- Posts: 4311
- Joined: Sat Apr 09, 2011 12:14 am
- Location: "The Dutch Branch"
- Contact:
Re: 'How To make' WNG Field Stand Clips
Thanks ! I guess you now will be swamped by orders for sets of springs at a fiver ? 
-
simon.holyfield

- Holder of a Platinum Anorak
- Posts: 4699
- Joined: Mon Oct 17, 2011 11:16 pm
- Location: Norfolk
- Contact:
Re: 'How To make' WNG Field Stand Clips
This is excellent Alan, you've excelled yourself this time.
I shall be having a go!
I shall be having a go!
cheers
Simes
'51 Square Four,
'58 Huntmaster,
'42 W/NG,
'30 Model A
https://ariel-square-four.blogspot.com
Simes
'51 Square Four,
'58 Huntmaster,
'42 W/NG,
'30 Model A
https://ariel-square-four.blogspot.com
-
alan.moore
- Holder of a Golden Anorak
- Posts: 1457
- Joined: Sat Jul 19, 2014 1:29 pm
- Location: Leicestershire UK
- Contact:
Re: 'How To make' WNG Field Stand Clips
Ha...that had crossed my mind. It was an interesting project. I have never tried hardening and tempering in order to make a spring before so there was a fair bit of learning by looking on Google and then by trial and error along the way. The video makes it look so easyVincent.vanGinneke wrote:Thanks ! I guess you now will be swamped by orders for sets of springs at a fiver ?
Took a day to work out the best way to get the bends just right. Sorry chaps but I have no intention of going into production
Cheers
Alan
1939 VH Redhunter;1942 RN WNG;1951 Triumph 6T Thunderbird;1970 BSA B175 Bantam;1986 Yamaha SRX600 single;1952 VHA engined project
http://cloggymoore.wix.com/triumph-pre-unit-6t
http://cloggymoore.wix.com/triumph-pre-unit-6t
-
alan.moore
- Holder of a Golden Anorak
- Posts: 1457
- Joined: Sat Jul 19, 2014 1:29 pm
- Location: Leicestershire UK
- Contact:
Re: 'How To make' WNG Field Stand Clips
Thanks Simon. I find the enjoyment is in working out how to do new stuff and then getting a decent result. The 'How To's'' and videos are a way of documenting the knowledge (like your Blog) and passing it on in the hope that others will gain something from it. I've had nearly 7000 views on the Burman Gearbox video I did so it looks like this sort of thing does help a few folks out.simon.holyfield wrote:This is excellent Alan, you've excelled yourself this time.
I shall be having a go!
Cheers
Alan
1939 VH Redhunter;1942 RN WNG;1951 Triumph 6T Thunderbird;1970 BSA B175 Bantam;1986 Yamaha SRX600 single;1952 VHA engined project
http://cloggymoore.wix.com/triumph-pre-unit-6t
http://cloggymoore.wix.com/triumph-pre-unit-6t
-
simon.holyfield
- Holder of a Platinum Anorak
- Posts: 4699
- Joined: Mon Oct 17, 2011 11:16 pm
- Location: Norfolk
- Contact:
Re: 'How To make' WNG Field Stand Clips
I just watched the video full screen. It's great what us shed dwellers can achieve isn't it!
Did you drill the holes while it was in the flat?
I noticed how strong the springs are. Mine, which are very similar (old, but not identical to either Ariel pattern) require a boot or a confident fist to get the stand in, but then at least it doesn't rattle. By the way, the 'confident fist' usually ends up punching the rear frame lug with subsequent loss of knuckle skin.
cheers
Simes
'51 Square Four,
'58 Huntmaster,
'42 W/NG,
'30 Model A
https://ariel-square-four.blogspot.com
Simes
'51 Square Four,
'58 Huntmaster,
'42 W/NG,
'30 Model A
https://ariel-square-four.blogspot.com
-
alan.moore
- Holder of a Golden Anorak
- Posts: 1457
- Joined: Sat Jul 19, 2014 1:29 pm
- Location: Leicestershire UK
- Contact:
Re: 'How To make' WNG Field Stand Clips
Simon,
I drilled the holes after bending so that I could get the clip positioned just right and then marked the centers...but before hardening!!
Yes they are strong, but they need to be. I would think a 'boot' would have been the appropriate device for a Field Standing securing tool in the day but in modern times we probably lean towards the 'confident fist'
Cheers
Alan
1939 VH Redhunter;1942 RN WNG;1951 Triumph 6T Thunderbird;1970 BSA B175 Bantam;1986 Yamaha SRX600 single;1952 VHA engined project
http://cloggymoore.wix.com/triumph-pre-unit-6t
http://cloggymoore.wix.com/triumph-pre-unit-6t
-
nevhunter
- Holder of a Platinum Anorak
- Posts: 5051
- Joined: Tue May 10, 2011 9:42 am
- Location: Victoria.. Australia.
- Contact:
Re: 'How To make' WNG Field Stand Clips
The holes are staggered so top and bottom are different unless they are ovalized. The budgen ones are ovalized and maybe the original ones are too. If they are hard to close you may have difficulty with them. I've never had one come adrift "in flight" so to speak but you need the shape pretty right as well as the thickness. I've seen different diameter "Legs" too, so you would have to compensate for that. Nev
Who is online
Users browsing this forum: No registered users and 19 guests