
OK - I was going to ask about tanks too. As far as I can tell, from 1951, because of restrictions on chrome, tanks would have been all red-painted - and the pictures I have seen show a kind of embellishment around the ariel logo (presumably to compensate for the lack of chrome).
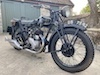
Mine does appear to have been chromed and appears very similar to some replacement models being advertised by companies such as Royal Spare Parts as being suitable for a 500cc Red Hunter. It has no "flutes" and a simple logo badge. There are some remnants of red pain around the edge of the badge and the front of the knee pads
Does this mean that mine was very early 1951?
Does it mean that mine has been replaced at some stage?
Does anyone know if early '51 NH 350 tanks were the same as those for 500cc models?
The dents in mine are probably repairable and fillable for a paint finish but I don't know if they could be repaired well enough to re-chrome. If they can't I will have to decide between painting mine red all over or buying a new tank.
I attach some pictures of mine and one being advertised on eBay by Royal spare parts.
(Being new to forums (fora?), am I better posting this here or starting a new thread?)
My 1951 NH Red Hunter Project
-
James Hickman
- Holder of a Nylon Anorak

- Posts: 128
- Joined: Wed Aug 23, 2017 1:55 pm
- Contact:
-
Vincent.vanGinneke

- Holder of a Platinum Anorak

- Posts: 4311
- Joined: Sat Apr 09, 2011 12:14 am
- Location: "The Dutch Branch"
- Contact:
Re: My 1951 NH Red Hunter Project
Hello James, I have been down the path with India tanks, dont! Ill fitting, and if you do want to buy , buy a non chromed one as you need to re place the tank mountings. 500 tanks are longer then 350 tanks, 3 liters more.
-
Keith.owen

- Holder of a Golden Anorak

- Posts: 1210
- Joined: Tue May 03, 2011 2:01 pm
- Location: Bramley, Hamsphire
- Contact:
Re: My 1951 NH Red Hunter Project
Hi,
looks like he real thing to me.
I'll send pics from underneath.
But judging by the overall condition and general look it seems a safe bet that it is original. DO CHECK that no-one has run a bolt through the mounting!
Keith
looks like he real thing to me.
But judging by the overall condition and general look it seems a safe bet that it is original. DO CHECK that no-one has run a bolt through the mounting!
Keith
- Attachments
-
Keith Owen
Editor Cheval de Fer
1950 Rigid Ariel VH
1951 Rigid Ariel NH (under construction)
1973 Norton 850 Commando Interstate
Editor Cheval de Fer
1950 Rigid Ariel VH
1951 Rigid Ariel NH (under construction)
1973 Norton 850 Commando Interstate
-
Keith.owen
- Holder of a Golden Anorak
- Posts: 1210
- Joined: Tue May 03, 2011 2:01 pm
- Location: Bramley, Hamsphire
- Contact:
Re: My 1951 NH Red Hunter Project
Sorry for the delay,
Below is the promised picture of the underside of my tank.
As you see it is like yours and it is not an Indian repro!!
BR,
Keith
Below is the promised picture of the underside of my tank.
BR,
Keith
Keith Owen
Editor Cheval de Fer
1950 Rigid Ariel VH
1951 Rigid Ariel NH (under construction)
1973 Norton 850 Commando Interstate
Editor Cheval de Fer
1950 Rigid Ariel VH
1951 Rigid Ariel NH (under construction)
1973 Norton 850 Commando Interstate
-
James Hickman
- Holder of a Nylon Anorak
- Posts: 128
- Joined: Wed Aug 23, 2017 1:55 pm
- Contact:
Re: My 1951 NH Red Hunter Project
Update: I'm making steady progress stripping down the bike.
My provisional plan is to dismantle the bike into major components: wheels, engine, forks, engine, gearbox etc (without “over-dismantling”) until I have a bare frame. As I go, I am separating out key chrome components that need re-chroming or replacing and labelling and boxing carefully. First items to be tackled will be any frame repairs, refinishing the frame, refurbishing front forks/steering and the wheels. End of Stage 1 should be assembly of “rolling frame”. I can then move on to restoring each major component at a time and re-assembling as I go.
The fuel tank holds petrol without leaks - and does appear to be the original chromed and painted version. I would like to have it rechromed, but it is quite badly dented, and I assume filler is not an option if chroming. Andy Mawrey at http://www.motorcycledentremoval.co.uk/ quotes £210 to remove the dents ready for chroming, so this may be the best route...
I'm beginning to think about paint finishes. I plan for black frame etc with chrome and damask red tank and wheels. Mine appears to have been painted maroon over black (and the maroon is a different colour to the remnants of red on the tank) - I'm not sure if that would have been done in the factory, or later. However, how best to do the black paintwork? My thinking is that powder coating is probably the best option for the main frame (but satin or gloss?) and the tinware should be painted high gloss black. But what about the "in-between" items: forks, mudguard stays, stand...? Paint or powder coat? Would it all have been gloss originally?
- Attachments
-
'50 NH 350 (Shiny)
'29 Model B (Oily Rag)
'29 Model B (Oily Rag)
-
Keith.owen
- Holder of a Golden Anorak
- Posts: 1210
- Joined: Tue May 03, 2011 2:01 pm
- Location: Bramley, Hamsphire
- Contact:
Re: My 1951 NH Red Hunter Project
Hi,
Whoever painted your bike red, I don't think it was the factory; it wasn't until later years (perhaps '53) that singles were painted all red by the factory.
I had my frame, engine plates and yolks powder coated satin black. Stays and tubular things I hand painted - using the right paint and good brush you'd not tell the difference from spraying. Guards number plates etc were sprayed. All of these items gloss.
I am not sure about powder coating; I had a leak from my petrol tank and it caused the powder coating to bubble (as though I'd used paint stripper). The only reason it didn't come off is because I allowed it to dry in situ. But then this is one of those discussions in which there are a number of camps. At the end of the day, each to his own.
I had the tank on my VH painted because the chroming alone was going cost some £600 before which it would have needed repairing / preparing to a very high standard. It really is a matter of how much you are prepared to spend. As it is the retched thing leaked and I ended up getting it repaired locally and then painting it myself. It is a learning curve but not so difficult as I had imagined. With patience it can be done with limited equipment at home.
Keith.
Keith Owen
Editor Cheval de Fer
1950 Rigid Ariel VH
1951 Rigid Ariel NH (under construction)
1973 Norton 850 Commando Interstate
Editor Cheval de Fer
1950 Rigid Ariel VH
1951 Rigid Ariel NH (under construction)
1973 Norton 850 Commando Interstate
-
James Hickman
- Holder of a Nylon Anorak
- Posts: 128
- Joined: Wed Aug 23, 2017 1:55 pm
- Contact:
Re: My 1951 NH Red Hunter Project
I've had a look at your forum blog - the VH looks great!Keith.owen wrote:I had my frame, engine plates and yolks powder coated satin black. Stays and tubular things I hand painted
'50 NH 350 (Shiny)
'29 Model B (Oily Rag)
'29 Model B (Oily Rag)
-
paul.jameson

- Holder of a Golden Anorak
- Posts: 2950
- Joined: Wed Oct 12, 2011 3:04 pm
- Location: Herefordshire
- Contact:
Re: My 1951 NH Red Hunter Project
If you want to have dents removed from your petrol tank I cannot praise too highly Ray Petett on the north side of Nottingham. The work he has done for me is just superb - on several tanks - and cheaper than the person you mention.
Chroming the tank is more costly and will depend upon whether the tank is pitted and needs building up with copper before polishing back then nickel then chrome plating. If it needs this, Derby chrome plating are the people to do the job but expect a hefty bill, (maybe £500 plus) along with superb results. Then you might need someone to paint and line the tank, unless you fancy having a go yourself? I paint and line my own tanks but most people like to delegate this job to someone else. So I don't know how much it costs these days.
Chroming the tank is more costly and will depend upon whether the tank is pitted and needs building up with copper before polishing back then nickel then chrome plating. If it needs this, Derby chrome plating are the people to do the job but expect a hefty bill, (maybe £500 plus) along with superb results. Then you might need someone to paint and line the tank, unless you fancy having a go yourself? I paint and line my own tanks but most people like to delegate this job to someone else. So I don't know how much it costs these days.
Paul Jameson
35 LG (project), 37 RH500, 52 ex ISDT KHA, 54 KH(A), 75 Healey 1000/4.
Former Machine Registrar & Archivist, General Secretary and Single Spares Organiser (over a 25 year period).
Now Archivist (but not Machine Registrar), Gauges and Clocks Spares Organiser.
35 LG (project), 37 RH500, 52 ex ISDT KHA, 54 KH(A), 75 Healey 1000/4.
Former Machine Registrar & Archivist, General Secretary and Single Spares Organiser (over a 25 year period).
Now Archivist (but not Machine Registrar), Gauges and Clocks Spares Organiser.
-
James Hickman
- Holder of a Nylon Anorak
- Posts: 128
- Joined: Wed Aug 23, 2017 1:55 pm
- Contact:
Re: My 1951 NH Red Hunter Project
Update:
Making good progress with the strip down. I had been concerned that the engine wouldn't turn - it didn't seem to be seized as it would move slightly then stop. Removal of the Mag chain cover revealed that the chain was off the mag sprocket and was therefore jamming. easily corrected and all seems to move smoothly.
I have now removed all the tinware and ancillaries leaving only the engine and gearbox in the frame. Have been photographing furiously as I go.
This morning it was time to separate the engine and gearbox ready for removal.
The first thing to do was to dismantle and remove the clutch - and the first line in the owners' guide is "...first removing the spring-retaining screws with the special kit screwdriver...". First job therefore was to make a "special kit screwdriver" from a piece of steel and an old stair spindle. (I may have over-engineered it a bit... ).
A further bit of fettling of a piece of angle iron was required to stop the shaft turning while I removed the main clutch housing retaining nut.
By the end of the day had removed the clutch, all the primary chain gear (noting very carefully the different sizes of screws for each of the holes in the primary chain cover) and the gear box.
).
A further bit of fettling of a piece of angle iron was required to stop the shaft turning while I removed the main clutch housing retaining nut.
By the end of the day had removed the clutch, all the primary chain gear (noting very carefully the different sizes of screws for each of the holes in the primary chain cover) and the gear box.
Next step the engine removal and initial stripping down is complete.
Making good progress with the strip down. I had been concerned that the engine wouldn't turn - it didn't seem to be seized as it would move slightly then stop. Removal of the Mag chain cover revealed that the chain was off the mag sprocket and was therefore jamming. easily corrected and all seems to move smoothly.
I have now removed all the tinware and ancillaries leaving only the engine and gearbox in the frame. Have been photographing furiously as I go.
This morning it was time to separate the engine and gearbox ready for removal.
The first thing to do was to dismantle and remove the clutch - and the first line in the owners' guide is "...first removing the spring-retaining screws with the special kit screwdriver...". First job therefore was to make a "special kit screwdriver" from a piece of steel and an old stair spindle. (I may have over-engineered it a bit...
Next step the engine removal and initial stripping down is complete.
'50 NH 350 (Shiny)
'29 Model B (Oily Rag)
'29 Model B (Oily Rag)
-
James Hickman
- Holder of a Nylon Anorak
- Posts: 128
- Joined: Wed Aug 23, 2017 1:55 pm
- Contact:
Re: My 1951 NH Red Hunter Project
Update: Started Front Fork Dismantling : Just How Do You Remove Those Oils Seals...?
Much of the steering head mechanism is missing and the bike originally came with the yoke inserted through the steering column – but only held together by gravity. Fortunately Draganfly have an exploded diagram of the fork/steering mechanism so as I disassembled I have highlighted which parts need replacing or are missing.It is remarkable how much can be bought off the shelf and I'm very impressed with Draganfly. Unfortunately the order of assembly of the steering head and where the “parts not illustrated” e.g. the second steering damper disc and the middle damper plate is not completely clear to me – but hopefully will become more clear as I reassemble... Most of what is there is in reasonably good order, but I will replace most of the nuts and bolts with stainless steel.
The only significant problem uncovered is some more sheared screws. At the top of the right hand fork leg there are 3 small (3BA x ¼”) screws that connect the spring cover shroud to the bottom of the yoke. Two of these have sheared and the receiving holes will need re-drilling and tapping. In addition two of the studs that connect the vertical mudguard support to the lower fork legs have sheared.
I spectacularly failed to remove the oil seals even with the “oil seal removal tool”. However hard I try, with the leg held in a vice, the tool won’t shift them, and has a tendency for its lugs to slip out of their slots. In the end I decided to put them aside for the time being – as they need replacing a more destructive method of removal may be required...(How to do so may be more clear when the replacements arrive and I can see how they go together better.) Any advice gratefully received!
Much of the steering head mechanism is missing and the bike originally came with the yoke inserted through the steering column – but only held together by gravity. Fortunately Draganfly have an exploded diagram of the fork/steering mechanism so as I disassembled I have highlighted which parts need replacing or are missing.It is remarkable how much can be bought off the shelf and I'm very impressed with Draganfly. Unfortunately the order of assembly of the steering head and where the “parts not illustrated” e.g. the second steering damper disc and the middle damper plate is not completely clear to me – but hopefully will become more clear as I reassemble... Most of what is there is in reasonably good order, but I will replace most of the nuts and bolts with stainless steel.
'50 NH 350 (Shiny)
'29 Model B (Oily Rag)
'29 Model B (Oily Rag)
Who is online
Users browsing this forum: No registered users and 24 guests